The first time I tried to check my engine oil, I had no idea what I was doing. I knew I needed to check it regularly, but the process seemed complicated. Do I need the engine running? What if the oil is dirty?
The more I thought about it, the more I realized how much I was overthinking it. After a little research and trial and error, I found that checking your oil is a straightforward process once you know the steps.
If you’re wondering how to check oil in your car and make sure your engine is well-maintained, I’ve got you covered. Let’s break it down step by step so you can keep your engine running smoothly for years to come.
Why Should You Check Your Oil Regularly?
Checking your oil is one of the easiest ways to ensure your car runs efficiently. Oil lubricates the engine, reducing friction and preventing wear. If the oil level is low or the oil is dirty, your engine can suffer from overheating or internal damage. By checking it regularly, you can catch any issues before they become costly repairs.
Signs That Your Oil Needs Checking
- Low oil levels: If the oil warning light appears on your dashboard, it’s time to check your oil.
- Dirty oil: If your oil is dark and gritty, it needs changing.
- Engine noise: If the engine sounds louder than usual, it might be due to a lack of lubrication.
How to Check Oil: The Manual Dipstick Method

For most vehicles, the manual dipstick method is still the most common way to check oil. Here’s a simple step-by-step guide to make sure you’re doing it right.
1. Preparation: Get Your Car Ready
Before you start checking your oil, there are a few things you need to do:
- Park on Level Ground: This ensures that the oil settles evenly, giving you an accurate reading.
- Turn Off the Engine: For the most accurate reading, the engine should be off for at least 10–15 minutes. This gives the oil time to settle back into the oil pan. However, some modern vehicles require the engine to be warm, so always check your Owner’s Manual for specific instructions.
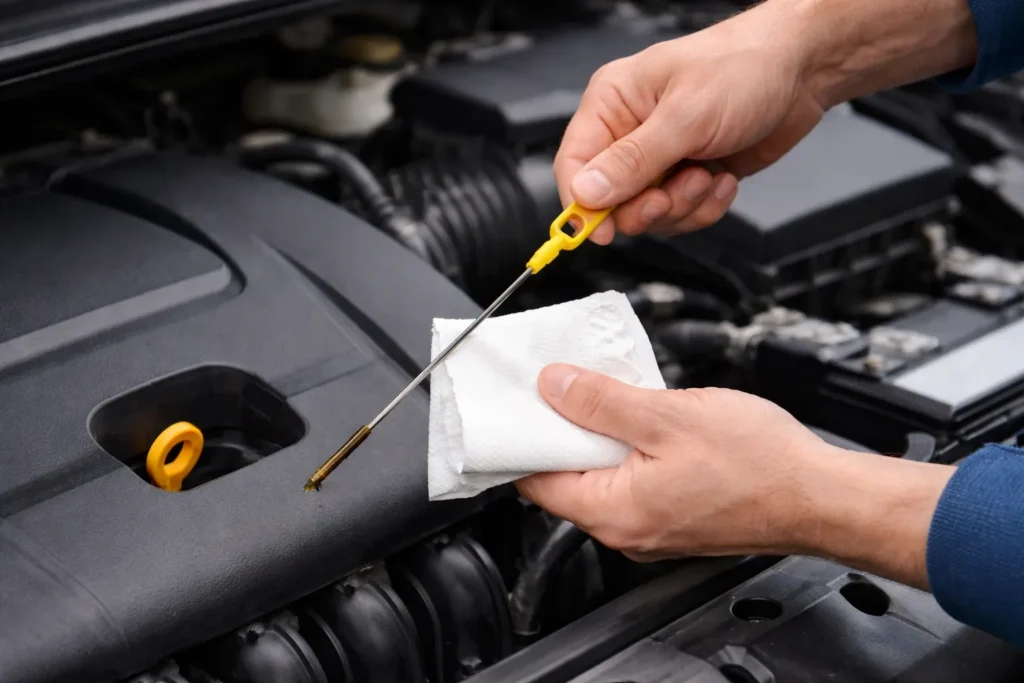
2. Locate the Dipstick
Once your car is ready, open the hood and look for the dipstick. It’s usually a brightly colored handle (yellow or orange) with an oil can icon. You’ll find it near the engine, and it’s the key to checking your oil level.
3. Pull and Wipe the Dipstick
Pull the dipstick out and wipe it clean with a lint-free rag or paper towel. This removes any oil that’s on the stick, giving you a fresh start for your reading.
4. Reinsert and Take a Second Reading
Once the dipstick is clean, insert it back into the tube all the way, then pull it out again. Now you’re ready to read the oil level.
5. Check the Oil Level
The dipstick will have markings that show you the oil level. These markings can be labeled as MIN/MAX, L/H, or even just two dots. Ideally, the oil should be between the two marks. If it’s at or below the bottom mark, it’s time to add oil.
6. Add Oil if Needed
If your oil level is low, you can add oil. It’s important to use the right type of oil recommended in your car’s manual. Use a funnel to avoid spills, and add oil a little at a time, checking the level after each addition.
How to Check Oil in Modern Cars with Electronic Monitors
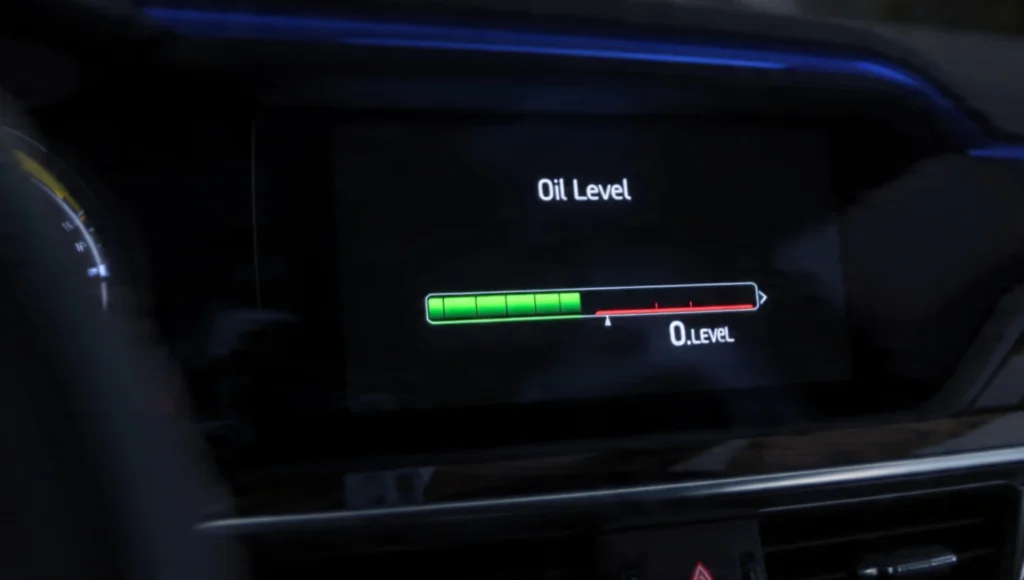
Many newer vehicles, especially luxury and high-performance models like BMW or Audi, don’t have a physical dipstick. Instead, they have electronic oil monitors built into the dashboard. Here’s how to use them:
1. Check the Dashboard
Navigate through your car’s infotainment system or vehicle status menu to find the “Engine Oil Level” monitor. The display will give you a digital reading of your oil level.
2. Follow the Prompts
For the most accurate reading, your car may require that it be parked on level ground with the engine at operating temperature. Make sure to follow any additional instructions provided by the system.
How to Inspect the Condition of Your Oil
When you check your oil, don’t just look at the level—also pay attention to its condition. Clean oil should be light brown or amber. Here’s what different oil appearances mean:
- Healthy Oil: Light brown or amber—this oil is still in good condition.
- Dirty Oil: Dark black or gritty—indicates it’s time for an oil change.
- Problematic Oil: If your oil looks milky or foamy, it could indicate a coolant leak (potentially a blown head gasket). Metal particles in the oil suggest internal engine damage.
Frequently Asked Questions
1. What are the signs of a blown head gasket?
A blown head gasket can be identified by milky oil, white exhaust smoke, and overheating. If you notice these signs, it’s essential to get your car checked by a professional immediately to avoid engine damage.
2. Tell me more about checking my car’s oil quality.
Checking oil quality is essential for understanding the health of your engine. Healthy oil should be amber or light brown and smooth. If the oil is thick, black, or gritty, it’s time for a change. Consistent oil checks can help catch issues like contamination or engine wear early.
Conclusion: Keeping Your Engine in Top Shape
Checking your oil regularly is an easy yet crucial step to ensure your car runs smoothly. By following the steps above, you can catch any potential problems early and keep your engine in great condition.
Whether you’re using the manual dipstick method or relying on your car’s electronic monitor, don’t forget to inspect the oil’s condition along with the level.
Tip: Regular oil checks are a great way to extend the lifespan of your engine and avoid costly repairs down the road. Make it part of your routine to check your oil every month or after every few thousand miles!