We’ve all been there: you’re sitting in your living room when you hear that annoying sound—a constant trickle of water from the bathroom. It’s a running toilet, and it’s draining your water bill!
The first time this happened to me, I had no idea what to do. I just kept hearing it, thinking it would somehow fix itself. But, like most home repairs, ignoring it only makes things worse.
Eventually, I learned how to fix a running toilet—and I’m here to walk you through it so you don’t have to waste time (or water).
A running toilet is typically an easy fix. It’s often caused by a small issue, like a leaky flapper or a malfunctioning fill valve. Once you know how to diagnose and fix it, you can solve the problem in no time. Let’s break it down step-by-step, so you can handle this plumbing challenge yourself.
What Causes a Toilet to Run Constantly?
A running toilet usually means that water is continuously flowing from the tank into the bowl. This is often caused by one of two issues:
- Flapper Problem: The flapper, which seals the tank, might be leaking. This allows water to seep from the tank into the bowl, keeping the toilet running.
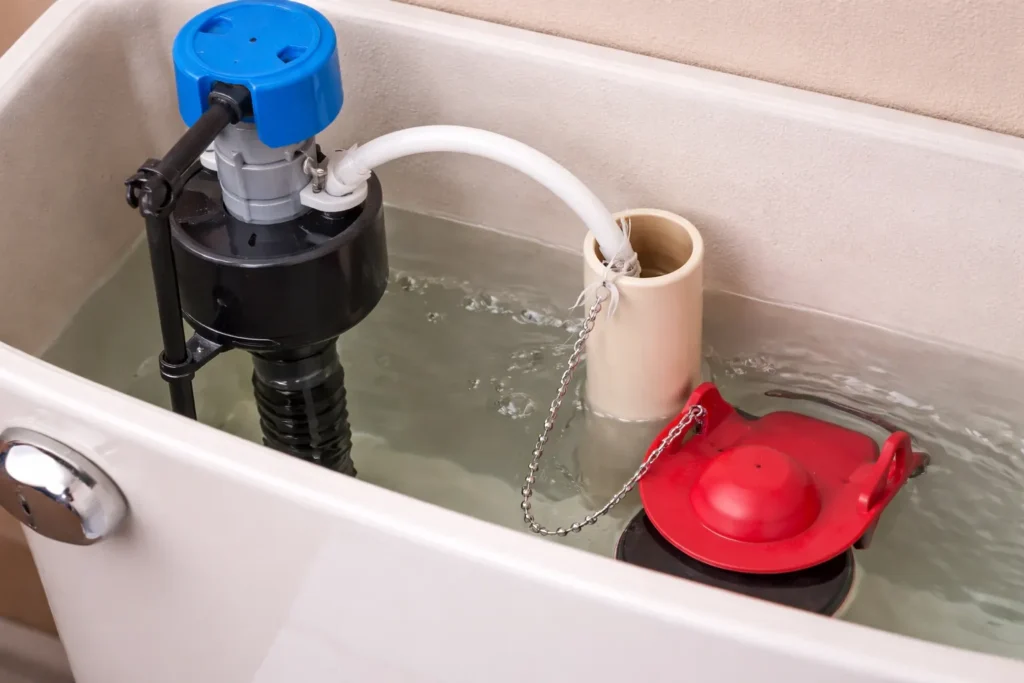
- Fill Valve Issue: The fill valve controls how much water enters the tank. If it’s malfunctioning or the float is set too high, water will flow into the overflow tube.
How to Fix a Running Toilet: Step-by-Step
1. Diagnose the Problem
Before diving into repairs, it’s crucial to identify the root cause of the issue. Here’s how to check:
- Lift the Tank Lid: Carefully remove the lid and check the water level in the tank.
- Water Below the Overflow Tube: If the water is below the overflow tube, the flapper is likely leaking. This means water is seeping into the bowl, and the tank is constantly refilling.
- Water Flowing into the Overflow Tube: If water is flowing into the overflow tube, it means the fill valve isn’t shutting off properly. This could be due to an incorrectly adjusted float or a faulty valve.
2. Fix a Leaky Flapper
The flapper is usually the main culprit for a running toilet. It’s the rubber or plastic seal at the bottom of the tank that controls water flow. Here’s how to fix it:
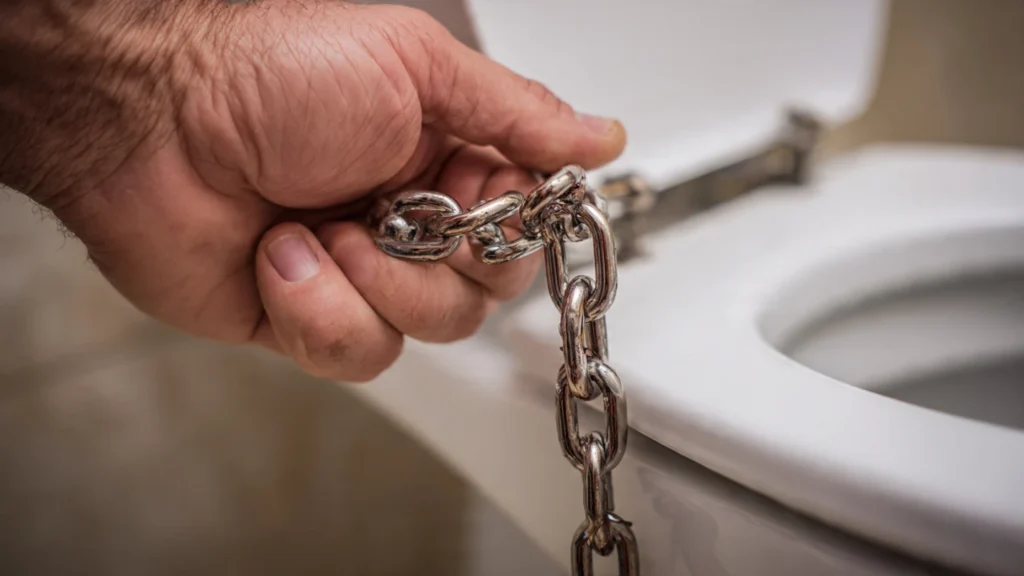
Check the Chain
- Slack or Tightness: If the chain is too tight, it can pull the flapper up, causing water to leak. Ensure the chain has about 1/2 inch of slack. If it’s too long, it can get caught under the flapper, also causing leaks.
Clean the Flapper
- Turn off the Water: First, turn off the water supply at the shut-off valve (typically located near the floor behind the toilet). Then, flush the toilet to drain the tank.
- Clean the Flapper: Wipe down the flapper and the seat it rests on with a rag to remove any mineral buildup. This can sometimes solve the problem if the buildup is preventing the flapper from sealing properly.
Replace the Flapper
- If the flapper looks warped, brittle, or cracked, it’s time for a replacement.
- Remove the Old Flapper: Unhook the flapper from the pins and remove it from the overflow tube.
- Install the New Flapper: Hook the new flapper in place, making sure it forms a tight seal over the opening.
3. Adjust the Water Level
If water is overflowing into the overflow tube, you need to adjust the water level in the tank.
Adjust the Float
- Float Cup Method: If your toilet uses a float cup, turn the adjustment screw counterclockwise to lower the float. This will cause the fill valve to shut off sooner.
- Ball Float Method: For older toilets with a metal arm and ball, gently bend the arm downward so the ball sits lower in the water.
Ideal Water Level
- The water should sit 1/2 to 1 inch below the top of the overflow tube. This ensures that the toilet fills correctly without causing water to overflow.
4. Replace the Fill Valve
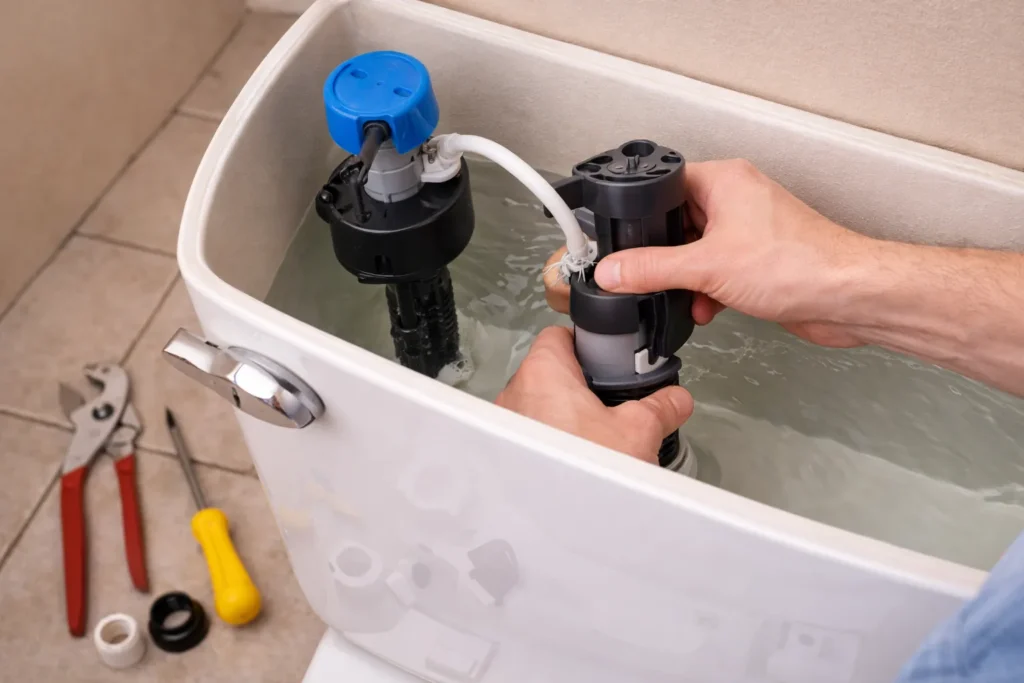
If adjusting the float doesn’t solve the issue, you might need to replace the fill valve. Here’s how:
Turn Off Water and Drain the Tank
- Shut Off Water: Turn off the water supply and flush the toilet to drain the tank.
Disconnect the Supply Line
- Unscrew the Water Line: Use a wrench to disconnect the water line from the bottom of the tank.
Remove the Old Valve
- Unscrew the Locknut: Using a wrench, unscrew the locknut under the tank and lift the old fill valve out.
Install the New Valve
- Insert the New Valve: Place the new valve into the hole and tighten the nut by hand. Don’t overtighten to avoid damaging the tank.
- Reconnect the Water Line: Reconnect the water line and turn the water supply back on.
Frequently Asked Questions
1. What are the signs a toilet needs replacing, not fixing?
A toilet might need replacing if:
- Cracks in the tank or bowl that cause constant leaks.
- Frequent repairs or issues that keep coming back.
- Inefficient flushing, especially with older models, wasting water.
2. How do I adjust the flapper chain on a toilet tank?
To adjust the flapper chain, remove any excess slack or tension. There should be about 1/2 inch of slack when the flapper is closed. This ensures the flapper can seal properly without being pulled up too early or being stuck open.
3. What are the advantages of float cup over ball float fill valves?
The float cup is generally more efficient and easier to adjust. It takes up less space and often results in a quieter operation compared to the older ball float system. The float cup system is also more precise, which can prevent overflows and leaks.
4. What causes the toilet to run after flushing?
A toilet can continue running after flushing due to a leaky flapper, a maladjusted fill valve, or a broken float. Ensuring these components are in good working order should stop the water from running continuously.
Wrapping It Up: Fix Your Toilet Like a Pro
Fixing a running toilet doesn’t have to be a daunting task. With a little patience and the right tools, you can handle common issues like a leaky flapper or an improperly adjusted fill valve.
By following these simple steps, you’ll save water, reduce your bill, and prevent further damage to your toilet.
Pro Tip: Regularly check and clean your toilet components to avoid future issues. A little maintenance goes a long way in keeping things running smoothly!